





















Sorry, this item is temporarily out of stock.
DIY Electronic Kit 64 SMD LED Patch Matrix Advertising Screen Number Display Soldering Project Practice Kit
Would you like us to let you know when it's back?
Oversigt
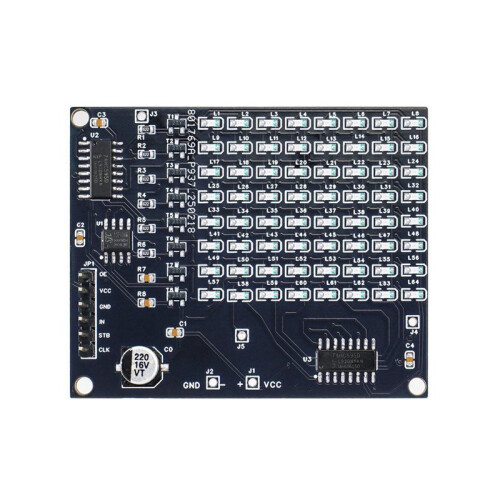
- This kit consists of 64 0805 SMD LED display units, using a row and column scanning method, which can display any character of 64 pixels. The kit comes with a microcontroller that has already burned the program and automatically plays the light animation when powered.
- The boot display method is: light up line by line → light up the entire screen and flash twice → display the "You're Good" character advertisement in sequence → peach heart flashes three times. To change the display content, you can bypass soldering to the MCU and connect control signals to JP1 to display any desired content.
- Circuit principle: The control core of the circuit is the microcontroller U1, which continuously transmits line scan data to U2 and U3 through a written program, and displays data to U4 and U5, thereby controlling the display screen to display corresponding patterns in a regular manner.
- Note: This is DIY kit, not a finished product. You will need to solder it yourself.
- Electronic DIY Kit
DIY Electronic Kit 64 SMD LED Patch Matrix Advertising Screen Number Display Soldering Project Practice Kit Beskrivelse
This kit consists of 64 0805 SMD LED display units, using a row and column scanning method, which can display any character of 64 pixels. The kit comes with a microcontroller that has already burned the program and automatically plays the light animation when powered.
The boot display method is: light by light the entire screen and flash twice display the "You're Good" character advertisement in sequence peach heart flashes three times. To change the display content, you can bypass soldering to the MCU and connect control signals to JP1 to display any desired content.
Circuit principle: The control core of the circuit is the microcontroller U1, which continuously transmits scan data to U2 and U3 through a written program, and displays data to U4 and U5, thereby controlling the display screen to display corresponding patterns in a regular manner.
Note: This is DIY kit, not a finished product. You will need to solder it yourself.
Installation precautions:
All components should be installed tightly against the surface of the circuit board, and attention should be paid to the polarity direction of integrated circuits, light-emitting diodes, transistors, and electrolytic capacitors. The circuit board provides J1 J6 test points, which can be used for waveform measurement, voltage measurement, and other expansion purposes. The power supply voltage can be 4-5V.
Installation precautions:
The products which are suitable for electronic enthusiasts to study and repair circuits. The installation of the circuit requires the buyer to have experience in the circuit.
Color: Black
Material: PCB
Package Contents:
1* DIY kit
Detaljer
| OPC | PTQDQ9G |
|---|---|
| Koder | 6033075648512 (EAN) |
| Produkt- og sikkerhedsoplysninger |
Produktdata
| Height | 2cm |
|---|---|
| Width | 6cm |
| Length | 10cm |
| Weight | 0.016kg |
| Colour | Black |
| Material | PCB |